
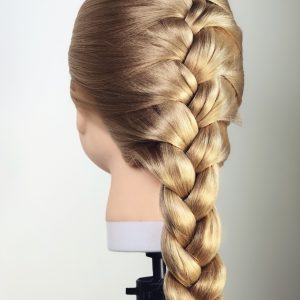
16 May How-to: Do a French Plait
How to do a French plait or French braid – exactly the same thing, both use 3 strands and both look ace – just called different things! Watch the video and/or refer to the steps below. Good luck!
Tip 1 – If hair is really thick, you could try working on half the amount of hair and do 2 plaits. Take a middle parting and carry that on from the crown to the nape of the neck separating the hair in half. Put one side in a ponytail out of the way so you can work on the other side first.
Tip 2 – If hair is ‘slippy’, fine or just hard to handle, spray hair with a ‘dry’ shampoo, light hold hair spray or ‘texture’ spray to give it a slightly grippier feel making it easier to handle. Try Batiste Dry Shampoo or Style Freedom Canned Texture Spray
- Take a section of hair at the top of the head – for this example we’re doing a central plait which will sit at the back of the head, starting at the top and ending at the bottom.
- Divide this section into 3 strands, a left, middle and right. Hold two strands in between your fingers in one hand and one in the other.
- Assuming you have the one strand in your right hand, take that and over the top of the middle strand, put it in that position so the right strand is now the middle strand and the middle strand is now the right strand.
- Hold the middle and right strand in your RIGHT hand (in between fingers to keep them separated) then take the left strand and put that one over the top and into the middle position. This is how you’ll be working – right side in the middle, left side in the middle, right then left and so on.
- Back to the right strand, this time you’re going to add a section of hair from the right side of the head. This is easier to do by holding the 3 strands you already have, in one hand – your left hand. Now with your free right hand, slide your forefinger from the face back to the middle of the head (where the plait is starting to form) and ADD that hair to the RIGHT strand. It will now feel a little thicker which is fine, all strands will be added to at some stage. The RIGHT (THICKER) strand does the same as before and is placed over the top and into the middle. Done. Take the time to get the strand looking neat before it’s ‘crossed over’ into the middle position.
- Back to the left strand, you’re going to do the same as you’ve just done but on the other side so, hold ALL 3 strands in your RIGHT hand – in between your fingers so they stay separate, then with your free LEFT hand, take your forefinger and again, slide it from the face back to where the plait is forming at the back of the head, lifting up/taking a section of more hair which is going to be added to the LEFT strand. The LEFT strand now feels thicker because you’ve added hair to it. Take your time to get the left strand neat before you place it over the top and into the middle position.
- Repeat step 5 and then step 6 as many times as you need to until you’ve added all of the ‘loose’ hair and you end up at the bottom of the head with just your 3 (thicker) strands. The hair you take will be getting lower down the head every time to add some. Once there’s nothing to add, you can carry on with a normal plait until you get to the end of the hair.
- Secure with a hair band.
I’ve added the diagram I gave out at a Dads and Daughters hair workshop I did. No excuse now – a video, steps AND a diagram. Go for it!


No Comments